- International
- Argentina
- Australia
- Austria
- Belgium
- Brazil
- Canada
- China
- Czaech Republic
- Denmark
- Finland
- France
- Germany
- Hong Kong
- Hungary
- India
- Ireland
- Italy
- Japan
- Mexico
- Netherlands
- Norway
- Philippines
- Poland
- Portugal
- Republic of Korea
- Romania
- Russian Federation
- Singapore
- Slovenia
- South Africa
- Spain
- Sweden
- Thailand
- Turkey
- UAE
- United Kingdom
- United States
Software and Printer Support
Select an issue below to view the solution.
SOFTWARE
1. My text is not aligned on the label.
2. I get an error when installing TagPrint® Pro.
3. Installing TagPrint Pro on a Windows 11 Computer.
4. Can I run TagPrint Pro with a thin client?
5. I get an installation error while installing the network version of TagPrint Pro.
6. I get a Windows Security message while installing the Printer Driver or TagPrint Pro.
7. My printer drivers disappeared when upgrading to Windows 7 or 10.
8. I can’t figure out how to setup “Clients” using the TagPrint Pro Network version.
PRINTER
1. The printer is skipping labels.
2. Print quality is poor.
3. The printer is not responding.
4. The printer has a flashing red light / I’m getting a print error.
5. The TT230SMC’s LCD shows a paper jam error.
6. The TTM430 / TTM460 shows a ribbon error.
7. My TT4030 isn’t cutting at END or BATCH CUT.
8. ShrinkTrak/foam nameplate labels slip in my TT230SM Series printer.
9. I get a cutter error when using my TTM430.
Software
For best results, follow these solutions in the order they appear.
1. My text is not aligned on the label.
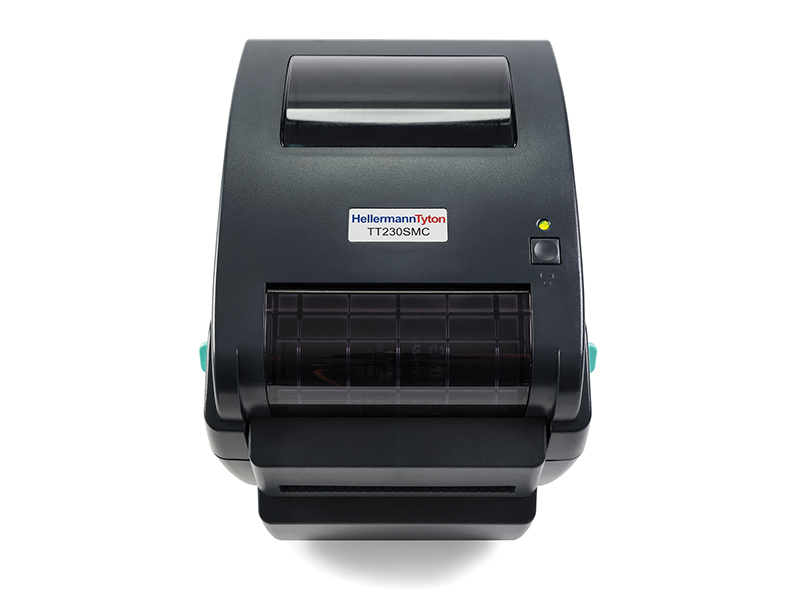 TT230 Series
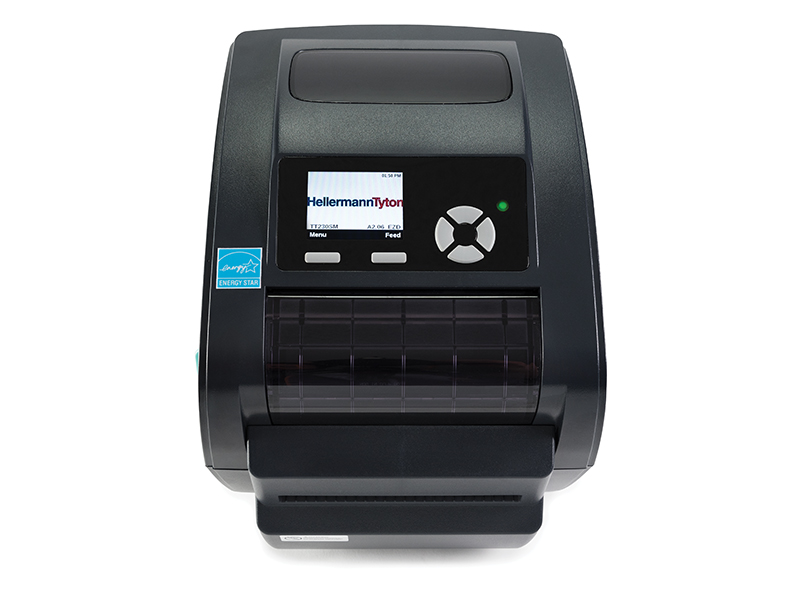 TT230 Series with LCD panel
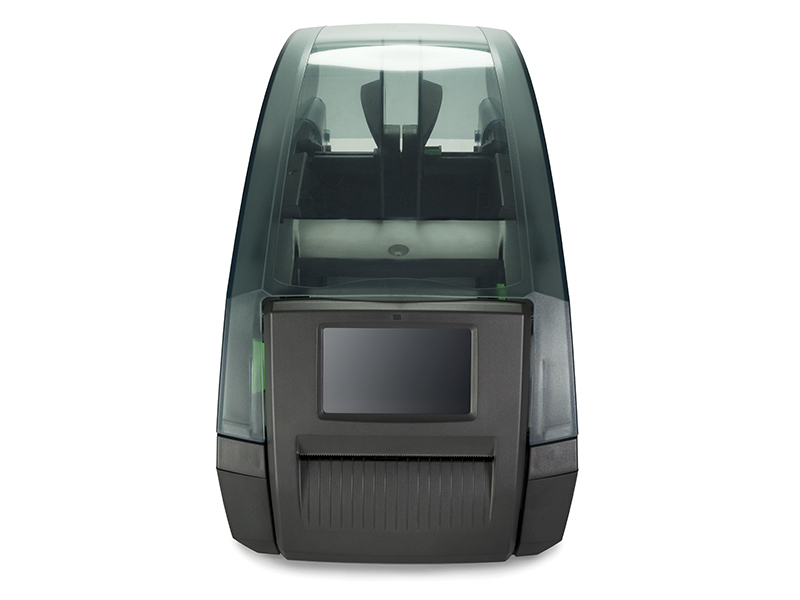 TTM430/460 Series
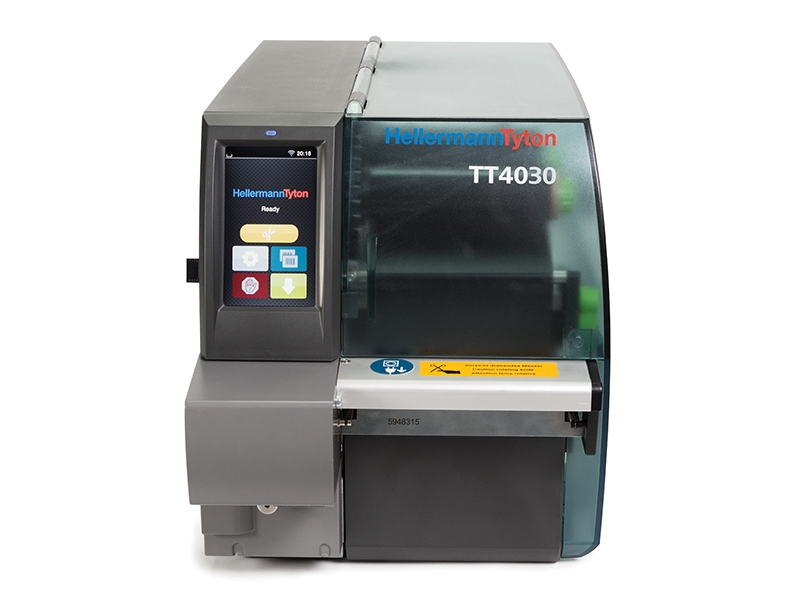 TT4030
Select a printer to view instructions.
TT230 Series
| 1 | In TagPrint Pro, ensure part number and Printer Family are correct. Try printing to see if the issue is resolved. |
| 2 | OPTION 1: In TagPrint Pro, go to the Utilities Tab. Check for updates. Update program and try printing to see if the issue is resolved. |
| 3 | OPTION 2: On your USB key, open the DiagTool and look for firmware revision. Compare against the current list and, if not up-to-date, upload new firmware and try printing to see if the issue is resolved. |
| 4 | OPTION 3: Put printer in dump mode:
|
| 5 | OPTION 4: Click the Windows Start button and select Devices and Printers. Delete the printer driver and reinstall the latest driver. Try printing to see if the issue is resolved. |
| 6 | OPTION 5: Click the Windows Start button and select Devices and Printers. Right-click your printer’s driver and select Printing Preferences. Click on the Stock tab. Make sure the Gap Height is 0.02. |
| 7 | If the problem still exists, please contact Tech Support for possible Repair. |
TT230 Series with LCD panel
Be sure you are using the driver for the newer TT230 series printer with LCD screen.
| 1 | In TagPrint Pro, ensure part number and Printer Family are correct. Try printing to see if the issue is resolved. |
| 2 | OPTION 1: Put printer in dump mode. On the LCD, select Menu, Diagnostics, Dump Mode. After dump completes, select Cancel. Try printing to see if the issue is resolved. |
| 3 | OPTION 2: On the LCD, select Menu, Diagnostics, Sensor, Gap. Intensity should be around 8 and Reading in the 200s. Try printing to see if the issue is resolved. |
| 4 | OPTION 3: On your USB key, open the DiagTool and look for firmware revision. Compare against the current list and, if not up-to-date, upload new firmware and try printing to see if the issue is resolved. |
| 5 | OPTION 4: Click the Windows Start button and select Devices and Printers. Right-click your printer’s driver and select Printing Preferences. Click on the Stock tab. Make sure the Gap Height is 0.02. Try printing to see if the issue is resolved. |
| 6 | If the problem still exists, please contact Tech Support for possible Repair. |
TTM430/460 Series
| 1 | OPTION 1: In TagPrint Pro, ensure part number and Printer Family are correct. Try printing to see if the issue is resolved. |
| 2 | OPTION 2: In TagPrint Pro, go to the Utilities Tab. Check for updates. Update program and try printing to see if the issue is resolved. |
| 3 | OPTION 3: Click the Windows Start button and select Devices and Printers. Delete the printer driver and reinstall the latest driver. Try printing to see if the issue is resolved. |
| 4 | If the problem still exists, please contact Tech Support for possible Repair. |
TT4030
| 1 | OPTION 1: In TagPrint Pro, ensure part number and Printer Family are correct. Try printing to see if the issue is resolved. |
| 2 | OPTION 2: In TagPrint Pro, go to the Utilities Tab. Check for updates. Update program and try printing to see if the issue is resolved. |
| 3 | OPTION 3: From printer touch screen, select Extras, Calibrate, Label Sensor and follow instructions. When finished, try printing to see if the issue is resolved. |
| 4 | OPTION 4: From printer touch screen, select Settings, Diagnostics and run Label Profile. Try printing to see if the issue is resolved. |
| 5 | OPTION 5: Click the Windows Start button and select Devices and Printers. Delete the printer driver and reinstall the latest driver. Try printing to see if the issue is resolved. |
| 6 | OPTION 6: On your USB key, look for firmware revision. Compare against the current list and, if not up-to-date, upload new firmware and try printing to see if the issue is resolved. |
| 7 | If the problem still exists, please contact Tech Support for possible Repair. |
2. I get an error when installing TagPrint® Pro.
This is typically caused by anti-virus or malware detection software, user permissions or enterprise software (EAS) such as IBM Enterprise Software, and can occur with any type of program you are installing.
| 1 | Try disabling your anti-virus and/or anti-malware software and ensure you’re a Local Administrator while installing TagPrint Pro. |
| 2 | If the problem persists, please contact Tech Support for possible repair. |
3. Installing TagPrint Pro on a Windows 11 Computer.
If you encounter errors when attempting to install TagPrint on Windows 11, you may need to install as a domain administrator. The instructions are going to vary depending how you have your computer configured. Your PC may have the Administrator account enabled, named something else, or it may be locked down by the IT department. It seems to be something only the built in Administrator account can do. So, we suggest that you need to be logged in as the built in Admin Account before upgrading or installing the Tag Print upgrade when using Windows 11.
EXAMPLE OF THE PROCESS AT THIS LINK:
This link shows the example using Windows 10, but the process is the same in Windows 11
4. Can I run TagPrint Pro with a thin client?
HellermannTyton currently does not support Tagprint Pro for use on thin clients. This has not been tested.
5. I get an installation error while installing the network version of TagPrint Pro.
Here are two examples of errors customers have encountered. They may be similar to the issue you are experiencing.
EXAMPLE 1: Error appears using SQL Server Express 2008, using the default settings for the database. After starting the TagPrint Pro server application, the connection was tested after entering the SQL Instance Name and Database Name and received a successful message. After selecting the “Typical” Installation, the error below appeared. Typically, this is due to the user account used to attach the database not having permissions from the SQL Server to create and attach the database.
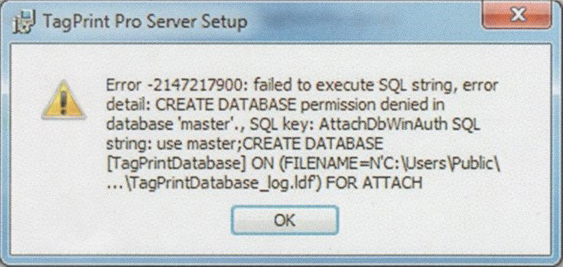
EXAMPLE 2: This error occurred for a user with SQL Server 2008 –10.1.1600.22, using .Net Framework 4.5 and Server 2012 R2. They have one local admin and no group policy in place that would prohibit the installation. The moment the user double-clicks on the TagPrint.Serverfile, the message below appears.
If the problem persists, please consult your IT department or system administrator, or contact Tech Support for possible repair.
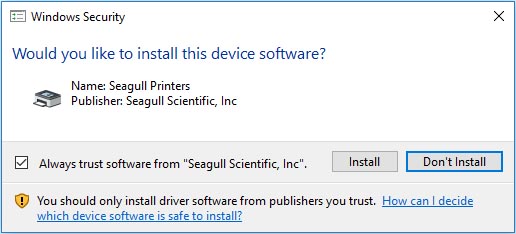
6. I get a Windows Security message while installing the printer driver or TagPrint Pro.
If the printer driver was “signed” by an unknown publisher, Windows prompts the user with the following Windows Security message. “Seagull Scientific, Inc.” is an authorized source in addition to HellermannTyton.
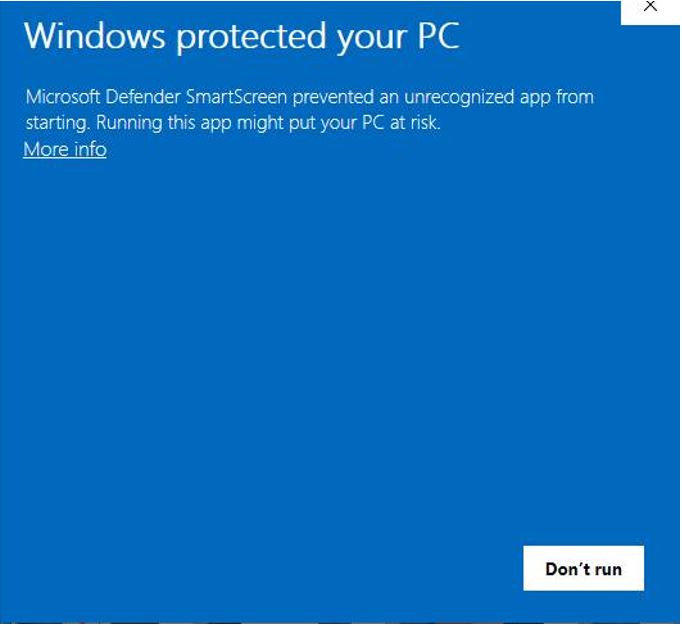
Windows may present the below warning as a security measure based on whether an application is from a trusted source or not. To bypass, click “More info” and then “Run Anyways” to move forward with the TagPrint Pro Installation.
7. My printer drivers disappeared when upgrading to Windows 7 or 10.
This is a common Windows upgrade issue affecting all printer drivers, not just HellermannTyton’s. Install the latest printer driver from our website to fix the issue.
If the problem still exists, please contact Tech Support.
8. I can’t figure out how to setup “Clients” using the TagPrint Pro Network version.
Note: These instructions may require the help of an IT professional.
1. Is TagPrint Pro installed and licensed with a network key?
2. Are the MDF and LOG files copied to the SQL Server and database attached?
• Can you use SQL Server Management Studio to query any of the tables in the database?
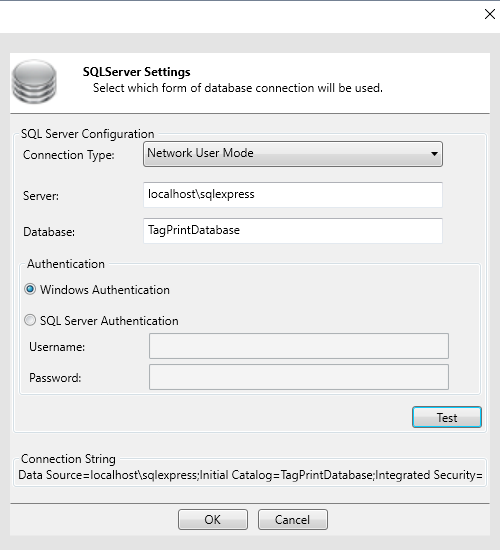
If these are correct, then the last step is to configure TagPrint Pro to connect to the database server instead of using the local database. This is done within the application using the Enter Network Settings button on the Utility ribbon. Change Connection Type to “Network User Mode,” fill in the Server and Database fields and choose the appropriate Authentication mode. Test the settings and, if correct, the OK button will become enabled and you can save the settings.
Printer
For best results, follow these solutions in the order they appear.
1. The printer is skipping labels.
- TT230 Series
- TT230 Series with LCD panel
- TTM430/460 Series
- TT4030
Select a printer to view instructions.
TT230 Series
| 1 | OPTION 1: Review the Printer Label Skipping Guide. Click here to review guide. Click here to review instructional video. |
| 2 | OPTION 2: Click the Windows Start button and select Devices and Printers. Right-click your printer’s driver and select Printing Preferences. Click on the Stock tab. Make sure the Gap Height is 0.02. |
| 3 | In TagPrint Pro, ensure part number and Printer Family are correct. Try printing to see if the issue is resolved. |
| 4 | OPTION 3: In TagPrint Pro, go to the Utilities Tab. Check for updates. Update program and try printing to see if the issue is resolved. |
| 5 | OPTION 4: On your USB key, open the DiagTool and look for firmware revision. Compare against the current list and, if not up-to-date, upload new firmware and try printing to see if the issue is resolved. |
| 6 | OPTION 5: Put printer in dump mode:
|
| 7 | OPTION 6: Click the Windows Start button and select Devices and Printers. Delete the printer driver and reinstall the latest driver. Try printing to see if the issue is resolved. |
| 8 | If the problem still exists, please contact Tech Support for possible Repair. |
TT230 Series with LCD panel
Be sure you are using the driver for the newer TT230 series printer with LCD screen.
| 1 | OPTION 1: Review the Printer Label Skipping Guide. Click here to review guide. Click here to review instructional video. |
| 2 | OPTION 2: Click the Windows Start button and select Devices and Printers. Right-click your printer’s driver and select Printing Preferences. Click on the Stock tab. Make sure the Gap Height is 0.02. Try printing to see if the issue is resolved. |
| 3 | OPTION 3: Put printer in dump mode. On the LCD, select Menu, Diagnostics, Dump Mode. After dump completes, select Cancel. Try printing to see if the issue is resolved. |
| 4 | OPTION 4: On the LCD, select Menu, Diagnostics, Sensor, Gap. Intensity should be around 8 and Reading in the 200s. Try printing to see if the issue is resolved. |
| 5 | If the problem still exists, please contact Tech Support for possible Repair. |
TTM430/460 Series
| 1 | OPTION 1: Review the Printer Label Skipping Guide. Click here to review guide. Click here to review instructional video. |
| 2 | OPTION 2: Click the In TagPrint Pro, ensure part number and Printer Family are correct. Try printing to see if the issue is resolved. |
| 3 | OPTION 3: In TagPrint Pro, go to the Utilities Tab. Check for updates. Update program and try printing to see if the issue is resolved. |
| 4 | OPTION 4: Click the Windows Start button and select Devices and Printers. Delete the printer driver and reinstall the latest driver. Try printing to see if the issue is resolved. |
| 5 | If the problem still exists, please contact Tech Support for possible Repair. |
TT4030
| 1 | OPTION 1: Review the Printer Label Skipping Guide. Click here to review guide. Click here to review instructional video. |
| 2 | OPTION 2: In TagPrint Pro, ensure part number and Printer Family are correct. Try printing to see if the issue is resolved. |
| 3 | OPTION 3: In TagPrint Pro, go to the Utilities Tab. Check for updates. Update program and try printing to see if the issue is resolved. |
| 4 | OPTION 4: From printer touch screen, select Extras, Calibrate, Label Sensor and follow instructions. When finished, try printing to see if the issue is resolved. |
| 5 | OPTION 5: From printer touch screen, select Settings, Diagnostics and run Label Profile. Try printing to see if the issue is resolved. |
| 6 | OPTION 6: Click the Windows Start button and select Devices and Printers. Delete the printer driver and reinstall the latest driver. Try printing to see if the issue is resolved. |
| 7 | OPTION 7: On your USB key, open the DiagTool and look for firmware revision. Compare against the current list and, if not up-to-date, upload new firmware and try printing to see if the issue is resolved. |
| 8 | If the problem still exists, please contact Tech Support for possible Repair. |
2. Print quality is poor.
- TT230 Series
- TT230 Series with LCD panel
- TTM430/460 Series
- TT4030
Select a printer to view instructions.
TT230 Series
| 1 | OPTION 1: Click the Windows Start button and select Devices and Printers. Right-click your printer’s driver and select Printing Preferences. Click on the Graphics tab. Set Dithering to None. Click OK. Restart TagPrint Pro. Try printing to see if the issue is resolved. |
| 2 | OPTION 2: Click the Windows Start button and select Devices and Printers. Right-click your printer’s driver and select Printing Preferences. Click on the Options tab. Uncheck “Use Current Printer Settings.” Change Print Speed to 2.00 in/sec and move the Darkness slider to 12. Try printing to see if the issue is resolved. |
| 3 | OPTION 3: Remove ribbon and gently clean print head with alcohol and a cotton swab. Replace ribbon. Try printing to see if the issue is resolved. |
| 4 | OPTION 4: Ensure it is a HellermannTyton printer ribbon and correct type for the stock being printed. If unsure, contact Tech Support. |
| 5 | If the problem still exists, please contact Tech Support for possible Repair. |
TT230 Series with LCD panel
Be sure you are using the driver for the newer TT230 series printer with LCD screen.
| 1 | OPTION 1: Click the Windows Start button and select Devices and Printers. Right-click your printer’s driver and select Printing Preferences. Click on the Graphics tab. Set Dithering to None. Click OK. Restart TagPrint Pro. Try printing to see if the issue is resolved. |
| 2 | OPTION 2: Click the Windows Start button and select Devices and Printers. Right-click your printer’s driver and select Printing Preferences. Click on the Options tab. Uncheck “Use Current Printer Settings.” Change Print Speed to 2.00 in/sec and move the Darkness slider to 12. Try printing to see if the issue is resolved. |
| 3 | OPTION 3: Remove ribbon and gently clean print head with alcohol and a cotton swab. Replace ribbon. Try printing to see if the issue is resolved. |
| 4 | OPTION 4: Ensure it is a HellermannTyton printer ribbon and correct type for the stock being printed. If unsure, contact Tech Support. |
| 5 | On LCD select Menu. Select Diagnostics. Select Printhead. |
| 6 | If the result is there are bad dots, print head may need to be replaced. |
| 7 | If the problem still exists, please contact Tech Support for possible Repair. |
TTM430/460 Series
| 1 | OPTION 1: Click the Windows Start button and select Devices and Printers. Right-click your printer’s driver and select Printing Preferences. Click on the Graphics tab. Set Dithering to None. Click OK. Restart TagPrint Pro. Try printing to see if the issue is resolved. |
| 2 | OPTION 2: Click the Windows Start button and select Devices and Printers. Right-click your printer’s driver and select Printing Preferences. Click on the Options tab. Uncheck “Use Current Printer Settings.” Change Print Speed to 2.00 in/sec and move the Darkness slider to 12. Try printing to see if the issue is resolved. |
| 3 | OPTION 3: Remove ribbon and gently clean print head with alcohol and a cotton swab. Replace ribbon. Try printing to see if the issue is resolved. |
| 4 | OPTION 4: Ensure it is a HellermannTyton printer ribbon and correct type for the stock being printed. If unsure, contact Tech Support. |
| 5 | If the problem still exists, please contact Tech Support for possible Repair. |
TT4030
| 1 | OPTION 1: Select the Print Tab, select Print Setup, Select Options Tab, change Print Speed to 40 mm/s and Darkness to 3. Click OK. Try printing to see if the issue is resolved. |
| 2 | OPTION 2: Remove ribbon and gently clean print head with alcohol and a cotton swab. Replace ribbon. Try printing to see if the issue is resolved. |
| 3 | If there are consistent vertical lines in the print (gaps in printing), please contact Tech Support for possible Repair. |
3. The printer is not responding.
- TT230 Series
- TT230 Series with LCD panel
- TTM430/460 Series
- TT4030
Select a printer to view instructions.
TT230 Series
| 1 | OPTION 1: Close TagPrint Pro. Re-boot the PC. Reopen TagPrint Pro. Try printing to see if the issue is resolved. |
| 2 | OPTION 2: Exit TagPrint Pro. Click the Windows Start button and select Devices and Printers. Right-click your printer’s driver and select Printer Properties. On the General Tab, select “Print Test Page.” If no response, see below. |
| 3 | OPTION 3: Click the Windows Start button and select Devices and Printers. Right-click your printer’s driver and select Printer Properties. Click the Ports tab. Is a USB port selected? If not, select one and return to the General Tab and select “Print Test Page.” |
| 4 | OPTION 4: Exit TagPrint Pro. Click the Windows Start button and select Devices and Printers. Delete the printer driver and reinstall the latest driver. Try printing to see if the issue is resolved. |
| 5 | If the problem still exists, please contact Tech Support. |
TT230 Series with LCD panel
| 1 | OPTION 1: Close TagPrint Pro. Re-boot the PC. Reopen TagPrint Pro. Try printing to see if the issue is resolved. |
| 2 | OPTION 2: Exit TagPrint Pro. Click the Windows Start button and select Devices and Printers. Right-click your printer’s driver and select Printer Properties. On the General Tab, select “Print Test Page.” If no response, see below. |
| 3 | OPTION 3: Click the Windows Start button and select Devices and Printers. Right-click your printer’s driver and select Printer Properties. Click the Ports tab. Is a USB port selected? If not, select one and return to the General Tab and select “Print Test Page.” |
| 4 | OPTION 4: Exit TagPrint Pro. Click the Windows Start button and select Devices and Printers. Delete the printer driver and reinstall the latest driver. Try printing to see if the issue is resolved. |
| 5 | If the problem still exists, please contact Tech Support. |
TTM430/460 Series
| 1 | OPTION 1: Close TagPrint Pro. Re-boot the PC. Reopen TagPrint Pro. Try printing to see if the issue is resolved. |
| 2 | OPTION 2: Exit TagPrint Pro. Click the Windows Start button and select Devices and Printers. Right-click your printer’s driver and select Printer Properties. On the General Tab, select “Print Test Page.” If no response, see below. |
| 3 | OPTION 3: Click the Windows Start button and select Devices and Printers. Right-click your printer’s driver and select Printer Properties. Click the Ports tab. Is a USB port selected? If not, select one and return to the General Tab and select “Print Test Page.” |
| 4 | OPTION 4: Exit TagPrint Pro. Click the Windows Start button and select Devices and Printers. Delete the printer driver and reinstall the latest driver. Try printing to see if the issue is resolved. |
| 5 | If the problem still exists, please contact Tech Support. |
TT4030
| 1 | OPTION 1: Exit TagPrint Pro. Re-boot the PC. Open TagPrint Pro. Try printing to see if the issue is resolved. |
| 2 | OPTION 2: Exit TagPrint Pro. Click the Windows Start button and select Devices and Printers. Right-click your printer’s driver and select Printer Properties. On the General Tab, select “Print Test Page.” If no response, see below. |
| 3 | OPTION 3: Click the Windows Start button and select Devices and Printers. Right-click your printer’s driver and select Printer Properties. Click the Ports tab. Is a USB port selected? If not, select one and return to the General Tab and select “Print Test Page.” |
| 4 | OPTION 4: Exit TagPrint Pro. Click the Windows Start button and select Devices and Printers. Delete the printer driver and reinstall the latest driver. Try printing to see if the issue is resolved. |
| 5 | If the problem still exists, please contact Tech Support. |
4. The printer has a flashing red light / I’m getting a print error.
- TT230 Series
- TT230 Series with LCD panel
Select a printer to view instructions.
TT230 Series
| 1 | Are you running continuous media with no gaps? (Yes – 2; No – 3) |
| 2 | In TagPrint Pro, select Print tab, Print Setup, Stock, and make sure Type is set to “Continuous” and Post Print Action is set to “Cut” (provided you have a cutter – otherwise, “None”). If using a cutter, set “Occurrence” after every page. Click OK. Turn printer off and on again and try printing to see if the issue is resolved. |
| 3 | In TagPrint Pro, select Print tab, Print Setup, Stock, and make sure Type is set to “Labels With Gaps” and Post Print Action is set to “Cut” (provided you have a cutter – otherwise, “Tear Off”). Click OK. Turn printer off and on again and try printing to see if the issue is resolved. |
| 4 | If the problem still exists, please contact Tech Support. |
TT230 Series with LCD panel
| 1 | Are you running continuous media with no gaps? (Yes – 2; No – 3) |
| 2 | In TagPrint Pro, select Print tab, Print Setup, Stock, and make sure Type is set to “Continuous” and Post Print Action is set to “Cut” (provided you have a cutter – otherwise, “None”). If using a cutter, set “Occurrence” after every page. Click OK. Turn printer off and on again and try printing to see if the issue is resolved. |
| 3 | In TagPrint Pro, select Print tab, Print Setup, Stock, and make sure Type is set to “Labels With Gaps” and Post Print Action is set to “Cut” (provided you have a cutter – otherwise, “Tear Off”). Click OK. Turn printer off and on again and try printing to see if the issue is resolved. |
| 4 | If the problem still exists, please contact Tech Support. |
5. The TT230SMC’s LCD shows a paper jam error.
| 1 | OPTION 1: Click the Windows Start button and select Devices and Printers. Right-click your printer’s driver and select Printing Preferences. Click on the Stock tab. Make sure the Gap Height is 0.02. |
| 2 | OPTION 2: Put printer in dump mode. On the LCD, select Menu, Diagnostics, Dump Mode. After dump completes, select Cancel. Try printing to see if the issue is resolved. |
| 3 | If the problem still exists, please contact Tech Support for possible Repair. |
6. The TTM430 / TTM460 shows a ribbon error.
 TTM430/460 Series Generation 1
- TTM430/460 Series Generation 2
Select a printer to view instructions.
TTM430/460 Series Generation 1
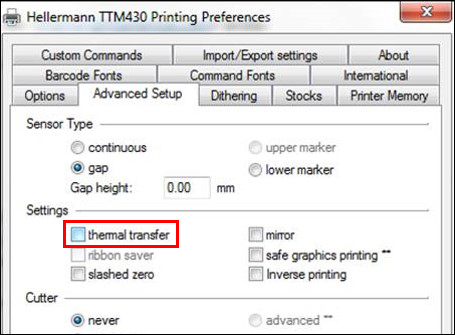
| 1 | OPTION 1: Close TagPrint Pro. Click the Windows Start button and select Devices and Printers. Right-click your printer’s driver and select Printing Preferences. Click the Advanced Setup tab. Under Settings, uncheck “thermal transfer.” Click OK. Try printing to see if the issue is resolved.
 |
| 2 | OPTION 2: On the front panel of the printer, press Menu. Scroll right to Setup. Scroll right to Print Parameters. Go to Transfer Print option, Press Enter (center arrow), Scroll to OFF, press Enter again. Try printing to see if the issue is resolved. |
| 3 | If the problem still exists, please contact Tech Support for possible repair. |
TTM430/460 Series Generation 2
| 1 | OPTION 1: Click the Windows Start button and select Devices and Printers. Right-click your printer’s driver and select Printing Preferences. Click the Advanced Setup tab. Under Settings, uncheck “thermal transfer.” Try printing to see if the issue is resolved.
|
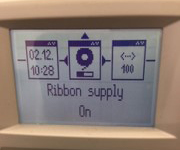
| 2 | OPTION 2: On the front panel of the printer, turn Ribbon Supply OFF. Try printing to see if the issue is resolved. |
| 3 | If the problem still exists, please contact Tech Support for possible repair.
 |
7. My TT4030 isn’t cutting at END or BATCH CUT.
OPTION 1: If printing a label using constant data and no data table:
| 1 | In TagPrint Pro, click File, Options. Select the General Options tab and check the box for DEVMODE. |
| 2 | Close and restart TagPrint Pro. |
| 3 | Create your label. When done, click on the tab just above the label and the Properties pane will appear on the right-hand side. |
| 4 | Set Cut to “Each” and set the value to 1 or any interval. |
| 5 | Print and save as usual. If the problem persists, please contact Tech Support. |
OPTION 2: If printing using a data table in TagPrint Pro:
| 1 | In TagPrint Pro, click File, Options. Select the General Options tab and check the box for DEVMODE. |
| 2 | Close and restart TagPrint Pro. |
| 3 | Create your label and table. |
| 4 | Select any unused column by clicking on the Alpha Character of that column. |
| 5 | Click on the Table tab at the top where the ribbons are displayed. |
| 6 | Click the Cut icon (with little scissors) and the column in your table will be highlighted in a different color. |
| 7 | Click on each cell where you want to cut and indicate that with an “X” or use any character to indicate where you wish to cut. |
| 8 | Click on the Label Design side of your screen and the Properties pane will open up on the right hand side. |
| 9 | Set Cut to “By Value.” |
| 10 | Save the design and the table and print. If the problem persists, please contact Tech Support. |
8. ShrinkTrak/foam nameplate labels slip in my TT230SM Series printer.
TT230 Series
With thick labels, the normal backup procedure of the printer cannot be utilized, or the product will bump against the cutter blade or the top of the tear off guide, causing the labels to become misaligned. To avoid this, you can change the driver settings in one of two ways.
| 1 | OPTION 1: Click the Windows Start button and select Devices and Printers. Right-click your printer’s driver and select Printing Preferences. Click on the Stock tab. Make sure the Post-Print Action is set to NONE. Click Apply and OK. Restart TagPrint Pro. Try printing to see if the issue is resolved. |
| 2 | OPTION 2: In TagPrint Pro, select the PRINT ribbon. Ensure your TT230 driver is selected. Click Print Setup. Select the Stock tab. Ensure that the Post-Print Action is set to NONE. Click OK. Try printing to see if the issue is resolved. |
| 3 | OPTION 3: Ensure the markers are not creating undue drag on the printer. For thick labels on a roll, we recommend using the optional label caddy (part number 556-00235) as opposed to dispensing the markers directly from the carton. In most cases, dispensing from the carton is not an issue, but if the cardboard core is not turning freely, the printer cannot pull the tag efficiently, causing the ShrinkTrak to misalign in the printer. |
| 4 | If the problem persists, please contact Tech Support. |
9. I get a cutter error when using my TTM430.
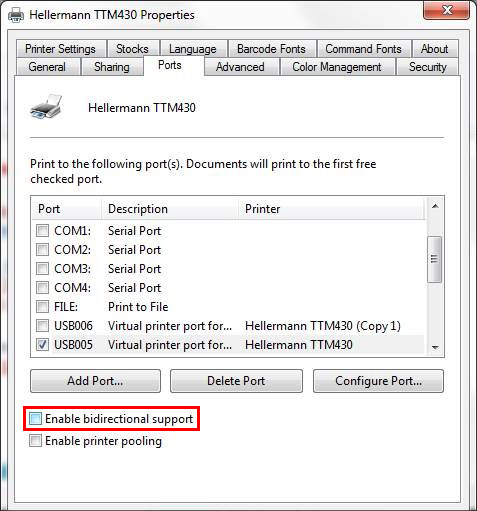
| 1 | OPTION 1: Click the Windows Start button and select Devices and Printers. Right-click your printer’s driver and select Printer Properties. Make sure “Enable bi-directional support” box is unchecked.
 |
| 2 | OPTION 2: Switch off printer, remove any visible material. Switch the printer off and then on. |
| 3 | OPTION 3: Close and restart TagPrint Pro. |
| 4 | OPTION 4: It could be a label is jammed in the cutter unit itself. Remove the cutter and open the back plate to check if there are any labels stuck in the cutter mechanism. |
| 5 | If the problem still exists, please contact Tech Support for possible Repair. |
Technical Support
How can we help? Please tell us about the issue you are experiencing. Provide as much detail as possible, including the product name and application. If this is a "line-down" emergency, please indicate that within your message.
Technical support problems typically are handled and resolved in one business day. We understand that your issue is important and we are committed to respond to all inquiries in a timely manner.
For technical support, please fill out the ID Support form.
Phone: 1-833-635-4315
About HellermannTyton
HellermannTyton is a global manufacturer of cable management and identification solutions for automotive, solar, electrical, construction, industrial automation, broadband and other OEM markets. The company's integrated approach to product design, sustainability, production, quality assurance and delivery is optimized to benefit local and global customers. HellermannTyton operates in 39 countries, with North American headquarters in Milwaukee, Wisconsin. (www.hellermann.tyton.com).